Showing posts with label DIY. Show all posts

Thursday, February 21, 2013

Texture Thursday: Marley Twists Side Bun


Welcome to my final installment of the Annual Sweetheart dance.  I went over how I found the Marley Twists Side Bun; now I will tell you how I was able to do it.  This will also work on loose hair!

Tools:
A couple of bobby pins.   I needed about 5-10.


Directions:
First of all, let your hair hang out!


Now follow these 8 steps:


  1. Pull four twists (or 50% of the front row of twists) to the front. 
  2. Clip the four twist and comb the rest of the hair to the side.
  3. Separate the hair into two pieces.
  4. Twist.
  5. Pin curl the side twist and secure with bobby pins.
  6. Remove clip from the front and wrap hair around your hand.
  7. Slide the twist off your hand and pin curl above the bun.  Secure with bobby pins.
  8. Tada! 
Results: 


Other than posing for the camera (thanks Brian), this style only took 5 minutes to do.  When I first styled it for the event, it took 30 minutes.  It is also less stress than putting my hair in a bun.  Be careful about the bobby pins you use because it can snag the marley twists.

I will be trying this hairstyle again for my best friend's wedding later this year :-). 

Wednesday, December 5, 2012

DIY Marley Twists

Ever since Thanksgiving, my co-workers and I have been playing catch up on a couple of projects.  A Thanksgiving wrap-up post will be available later this week.

Happy December! 

This past weekend, I had my heart set on Marley Twists.  When I went out of town for Thanksgiving, I found out that my sister twisted her hair for the winter.  They looked so nice that I wanted them too, especially since I haven't had them since 2009.  Braids and Twists are kinda expensive and it takes forever to do, so I decided to see how install them myself.  Ever since I had my latest trim in October, my hair has been shorter than what I’m use to.  Co-washing has been making my hair much softer, but I experience shrinkage; making it harder to put my hair in ponytails.  So I decided protective styling will help with letting my hair take a break and give it time to grow.
I saw a post on CurlyNikki and alovelyDAYbr about how to install medium size Marley twists and how simple it was.  I decided to buy the Marley hair before I went out of town and did my research on how to twist the hair and blend it with my kinky-curly hair.
Estimated time: 4 hours
    • 1 hour: washing (sulfate free shampoo and conditioner), deep conditioning and leave-in conditioner
    • 1 hour: 80% air dry and tension blow drying the rest
    • 2 hours: Moisturize hair, Parting sections, separating and fluffing the marley hair, and twisting hair with gel
 Total amount of twists: 26 
  • I brought 2 packs of LoMe Marley hair. 

  • I tangled two twisted so that cut my sections down to 26.
Brian helped me separate the hair.
  •  I parted my hair in 4 big sections.  Next I divided 26 by 4 to see how many mini sections I had to create.  The front sections had 7 and the back had 6.

Maintenance:
  • Spray with oil daily.
  • Wipe through scalp when itchy/on the weekends.
  • Wrap hair with a satin scarf.


Results: Love em’!

Next time I think I will make them tinier but they work for now.  I have gotten so many compliments from everyone, so I think I will do this again after my 3 month trim in January.  Basically I spent $8 for an $80-$180 service! 

And they looked awesome on my birthday yesterday!


---------
Update: January 2013 

I kept this awesome hair style in for a month and it was still low maintenance!  When installing this, make sure you use gel that will keep your natural hair inside the twists.  I had to refresh some areas because my gel didn't have a strong hold.  I will be installing these again in February.  Here are other hair styles I had during the month of December:


Monday, July 9, 2012

Married Monday: Pinterest Challenge Results

Friday Night, Brian and I got to see The Amazing Spider-man movie!  I've been waiting years since Spider-man 3 and I was super excited.  We had a horrible thunderstorm that night, so we had to run from the packed parking lot to the theatre.  The movie was great and a completely different story line than the last three.  I can't wait for the sequel.

The next morning, I was super pumped to complete my first Pinterest DIY craft for the Pinterest Challenge.  I finally narrowed down which shirt I wanted to use for my DIY Fitted Husband T-Shirt and the guest room was clear for me to start.

Example DIY Fitted Husband's T-shirt:

-From Connect the Dotsons:

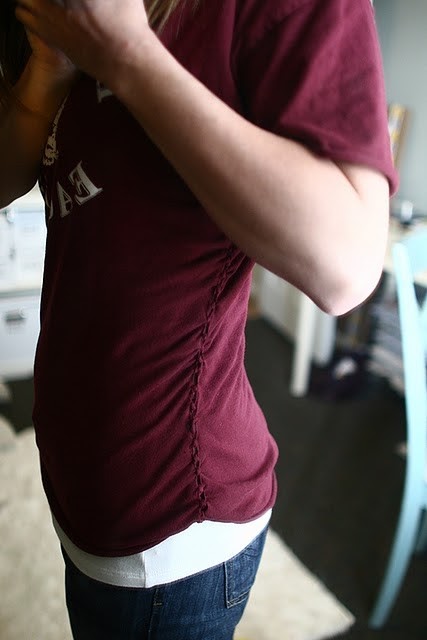
Chela's DIY Fitted Husband's T-shirt:


Directions:

1. Pick a large shirt to work with.  I have so many Mario shirts, so I decided to pick one that I wouldn't cry over if I messed it up.
2. It was an XL.
3. Turn the shirt inside out.
4. The original creater eyeballed the edges.  I decided to overlay a fitted t-shirt that I already had.
5. I folded the shirt in half and cut around the sides.
6. I also cut the bottom.
7. Fringes!
8. Double knotted the fringes.
9.  I turned the shirt on the right side.

Results:
Pros:
I loved this easy project.  Even though I love to sew, I chose this project because it was really simple and I always wanted a fitted video game shirt.  When I wore these shirts, I always tied it in knots, which usually made my back sore if I had to drive.  The project took less than an hour and it wasn't messy at all. 

Cons:
The only problem I had with this project were the sides of the shirt.  If you didn't tie the knots tight, it created gaps.  The creator of the project did suggest putting on a shirt underneath.  I also slept in it to see how it stood up to other conditions before I put it in the wash and some of the fringes poked through the double knotted seams in the morning.  I did wash the shirt yesterday, so I will give you all an update of how that went.

Overall, I loved it being my first real DIY craft.  If I were to do it again, I would sew it.

Update:
The shirt didn't do too well in the wash.  The fringes showed on the outside and the gaps got larger.  :-(

Friday, July 6, 2012

The Pinterest Challenge - Summer Edition!


Thanks to my friend Alex @ Good Girl Gone Wife, I found out about the Pinterest Challenge!  Hosted by Sherry from Young House Love , Katie from Bower Power, Kate from Centsational Girl and Michelle from Ten June, this project challenges pinners to actually make something we've pinned.

Here are the rules from Centsational Girl's blog:
"Here’s how it works:  No project is too big or too small!  Pick any project you have pinned or one you have seen on Pinterest and tackle it for your post.  Then write up your completed project and include a link to the Pinterest inspired project on Tuesday, July 10th, you’ve got one week!  Please be sure to link to the original source of the Pinterest inspired project too.  There will be link parties on that day by the co-hosts, so add your Pinterest Challenge project to any or all of them and link back to your hostess too. "
On Pinterest, I usually try awesome hair style ideas and recipes but I wanted to step outside the box and try something different.  I decided to make a fitted tee using the million of video game shirts my husband passed down to me when he used to work in retail.

Example DIY Fitted Husband's T-shirt:

-From Connect the Dotsons:

 I will let you all know how it goes with pictures on Married Monday!

Related Posts Plugin for WordPress, Blogger...
Pin It button on image hover